
Oracle has released something that I think it is pretty interesting, a container Image of Oracle Autonomous Database, that means that you don’t need Oracle Cloud Infrastructure if you want to try Autonomous Database, also this images is FREE, so let’s see how to use!
First at all, you can read the documentation here and find information about the license as well: Use the Oracle Autonomous Database Free Container Image
In the documentation, Oracle focuses on using podman. I will use Docker instead since I’m familiar with it. However, it is almost the same, so feel free to use the one of your preference.
and btw I’m not going to focus on what Docker is, what a container image is, or even Podman in this post. If you don’t know, feel free to comment, and I’ll get back to you =)
Oracle Autonomous Database Free Container Image and License
The Oracle Autonomous Database Free Container Image allows you to run the Autonomous Database in a container on your own system, without needing access to the Oracle Cloud Infrastructure Console or the internet. Running the database in a container provides a local and isolated environment for easier development, testing, and exploration of its features.
Recommendations for Resource Allocation for the Autonomous Database Free Container Image
The following is the recommended resource allocation for the Autonomous Database Free Container Image based in the documentation:
- 4 CPUs
- 8 GB memory
There are some restrictions for the Autonomous Database Free Container Image, you can check it in the documentation.
Now, let’s get to the point
Obtain the Autonomous Database Free Container Image
I have a VM with Linux, and Docker is installed on it. So the first thing is to download the container image. For that, I used the following command:
docker pull container-registry.oracle.com/database/adb-free:latest
Great!, I have my docker image now:
docker images
Start Autonomous Database Free Container Image
So! I have the image. Let’s create a container using the image.
docker run -d \
-p 1521:1522 \
-p 1522:1522 \
-p 8443:8443 \
-p 27017:27017 \
--hostname localhost \
--cap-add SYS_ADMIN \
--device /dev/fuse \
--name adb_container \
container-registry.oracle.com/database/adb-free:latest
Great, my docker image is running and my container ID in this examples is: 0fb4bc594d6c
Good, so couple of things you should know. The image has some default expired password for the ADMIN user for the instances: MY_ATP and MY_ADW.
In order to connect we have to change these password, we can do that running the change_expired_password.sh mentioned in the documentation and specify an Autonomous Database instance, let’s change it for the MY_ATP database.
- MY_ATP: Default expired ADMIN password: Welcome_MY_ATP_1234
- MY_ADW: Default expired ADMIN password: Welcome_MY_ADW_1234
My container id as mentioned before is: 0fb4bc594d6c
docker exec 0fb4bc594d6c /u01/scripts/change_expired_password.sh MY_ATP admin Welcome_MY_ATP_1234 Welcome_newpass123_MY_ATP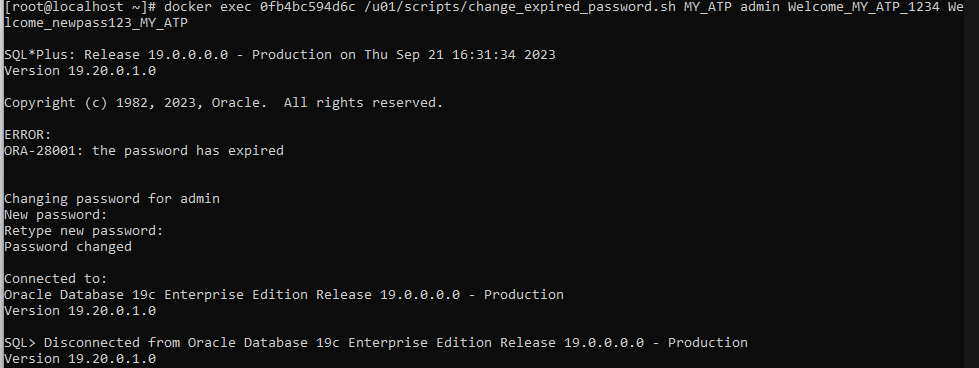
Great, I have changed the password, let’s try to connect and see if that works, right?
When you start the container, Autonomous Database generates a wallet in /u01/app/oracle/wallets/tls_wallet, we need to copy those file.
I will create a folder, as this is for testing purpose I will do that in the /tmp
docker cp 0fb4bc594d6c:/u01/app/oracle/wallets/tls_wallet /tmp/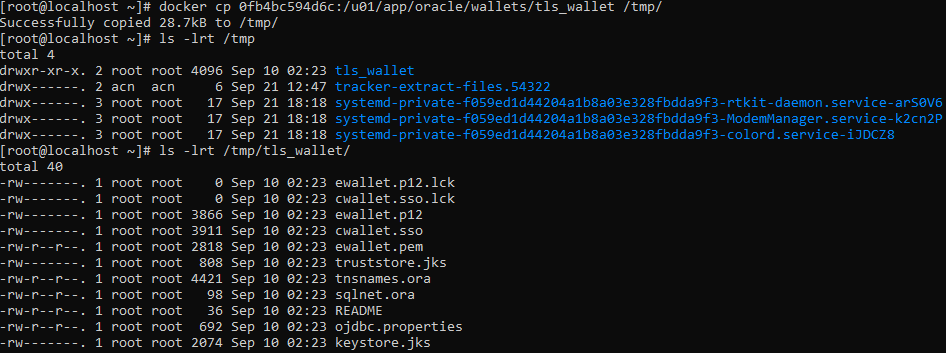
Ok, so the tls_wallet folder was copied to our /tmp in our local VM, inside the folder we can see that there are wallets, keystore, ojdbc properties and a sqlnet.ora y tnsnames.ora file
If we take a look to the tnsnames.ora file we can see that there are some entries define that we can use to connect to our databases in our container:

Great, we have all we need , in the same VM I have a Oracle 23c free installation, I will use sqlplus inside those binaries binaries to connect to MY_ATP database, in order to that I will define my ORACLE_HOME and TNS_ADMIN variables:
export ORACLE_HOME=/opt/oracle/product/23c/dbhomeFree
export TNS_ADMIN=/tmp/tls_wallet/
export PATH=$PATH:$ORACLE_HOME/bin
Btw, since I’m going to connect using the oracle user, I need to provide read access to the /tmp/tls_wallet and files inside it. Otherwise, the oracle user won’t be able to read the wallets, and the connection will fail.
Let’s do a tnsping test for entry my_atp_low
tnsping my_atp_low
Great, that’s working, btw you can get more information from the purpose of all the lias from here: Manage Concurrency and Priorities on Autonomous Database
Finally, let’s connect
sqlplus admin@my_atp_lowIt will prompt for admin password that I have changed previously to: Welcome_newpass123_MY_ATP

I’m in, Awesome!
This has been just a overview about how to use the image that Oracle has released from Autonomous Database
Miscellaneous
Let’s recap first, my container ID that is running is: 0fb4bc594d6c, I will access to it so we can deep a little bit about it, for that I will run this docker command:
docker exec -it 0fb4bc594d6c bashGreat, I’m inside the contianer now:

A database instance is running with name POD1, I wanted to connect using OS authentication but somehow it is not working

I have checked that the oracle user belongs to the correct group. I have checked the installation and other things, but I couldn’t find out what could be the issue. Maybe Oracle did it on purpose. Anyway, if you find a way, let me know!

Leave a reply to fsarcosdb Cancel reply