

FinOps is a big deal these days, isn’t it? I’ve seen many customers struggle with it, especially when it comes to managing compute resources efficiently. When you buy an Exadata, whether it’s Exadata on Dedicated Infrastructure (ExaDB-D), Exadata Cloud@Customer (ExaDB-C@C), or even Exadata on Exascale Infrastructure (ExaDB-XS), you really should have tight control over your OCPUs and ECPUs.
Most customers follow one of two strategies:
- Size big upfront: “Let’s start with plenty of OCPUs and adjust later.”
- Size small : “Let’s only use what we need now, and scale when things get busy.”
Both strategies can work, but each has its pitfalls.
- In the first scenario, you’re probably overpaying, and someone will eventually question that bill.
- In the second, your costs are under control, but users might complain when performance drops because the VM clusters are maxed out at 100%.
So, what if you could set this dynamically?
Well, you can! with ODyS (Oracle Dynamic Scaling)
I’ve talked about ODyS before in my post ExaDB-C@C/ExaDB-D – OCPUs are draining my wallet! Any tips to save some cash? but this time, we’ll go deeper into one of the best ways to deploy ODyS: running it in Kubernetes.
If you’re curious how ODyS works in a Kubernetes setup, this is your guide.
- IAM Policies
- ODyS Authentication to the Control Plane
- ODyS RPMs
- ODyS in Kubernetes Architecture with ds4k8s
- Miscellaneous
- Wrap Up
IAM Policies
To use ODyS, certain OCI IAM policies must be in place. These policies relate to the resources CLOUD_VM_CLUSTER_UPDATE and CLOUD_EXADATA_INFRASTRUCTURE_UPDATE, and follow the principle of least privilege (PoLP).
The key permission here is USE, which allows both read/inspect operations and updates. In this case, it lets ODyS modify OCPU/ECPU allocations for your VM Clusters.
If your VM Clusters live in different compartments: say DEV, PRE, and PROD, you’ll need to set these policies for each one. For example:
Allow group <groupname> to use cloud-exadata-infrastructures in compartment <compartment name>

Allow group <groupname> to use cloud-vmclusters in compartment <compartment name>

-- The following policies are needed for ODyS remote plugging use by kubernetes pods

Allow group <groupname> to inspect db-nodes in compartment <compartment name>

Allow group <groupname> to read virtual-network-family in compartment <compartment name>
With the right IAM policies in place, the next step is to let ODyS authenticate and talk to the OCI control plane
ODyS Authentication to the Control Plane
ODyS works by calling OCI APIs to scale up or down OCPUs/ECPUs, so you’ll need to create a user that belongs to the group with the IAM policies defined above.
ODyS supports three authentication methods:
- oci-cli
- instance_principal
- resource_principal
Currently, only oci-cli works inside Kubernetes pods, so you’ll have to set up that user and provide the corresponding API signing key and configuration.
For more details, check the official Oracle documentation: How to Generate an API Signing Key
ODyS RPMs
You have created the user, added to a group with the policies you need and create the api signing key… well, there is still more work to do.
Before we get into how this works I need to mention a couple of things, there are basically three RPMs related to ODyS:
- DynamicScaling Engine
The heart of ODyS, this component calls the OCI REST APIs to perform scaling operations.
Download it from Oracle Support: Doc ID 2719916.1 (or KB38275 in the new portal). - DynamicScaling Remote Plugin
Required as your ODyS pods needs to connect to remote VM cluster nodes via SSH to gather load information.
Download it from Doc ID 2770544.1 (or KB52160). - DynamicScaling Chart (optional)
A visualization tool to generate charts showing current OCPU/ECPU usage and cluster load.
Available from Doc ID 2762561.1 (or KB36444).
You’ll also want to install ds4k8s, a helper utility developed by Oracle to simplify ODyS image creation and Kubernetes deployment.
Get it from Doc ID 2940064.1 (or KB153175).
ODyS in Kubernetes Architecture with ds4k8s
Using ds4k8s is straightforward.
Just install the appropriate RPM for your Oracle Linux version (7, 8, or 9):
as root or using sudo:
rpm -i ds4k8s-1.0.3-X.el8.x86_64.rpm
(*) X=version number
you can update an installed version as follow as root or using sudo:
rpm -Uvh ds4k8s-1.0.3-X.el8.x86_64.rpm
(*) X=version number
Once you have ds4k8s installed you will find that files are created under /opt/ds4k8s
tree /opt/ds4k8s/

/opt/ds4k8s/
├── build_docker_image
│ ├── Dockerfile
│ ├── makefile
│ ├── ODyS_RPMs
│ │ └── README
│ └── utils
│ ├── dynamicscaling-gsetocpu
│ └── dynamicscaling_init
└── ds4k8s.bin
4 directories, 6 files
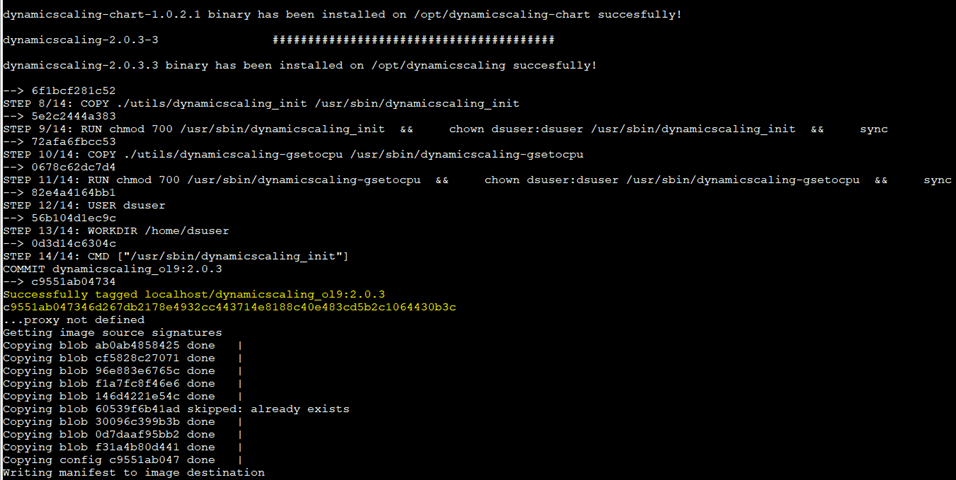
Building the ODyS Docker Image
Before using ds4k8s, make sure you have Docker or Podman installed, since you’ll need to build a custom image. Copy the ODyS RPMs you downloaded into the folder:
/opt/ds4k8s/build_docker_image/ODyS_RPMs
Edit the env.mk file in /opt/ds4k8s/build_docker_image/ to specify your container engine and target registry.
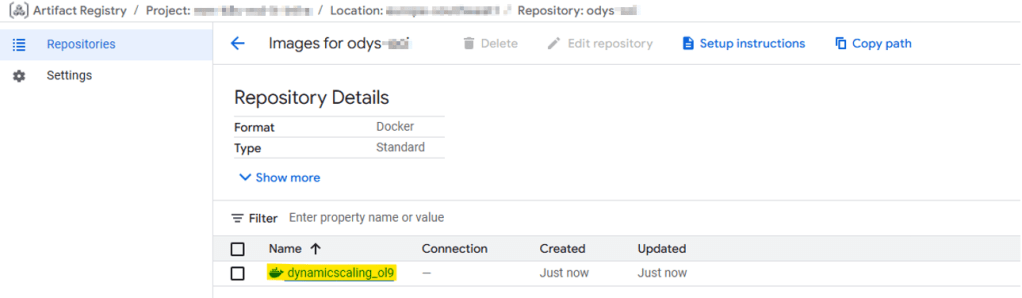
In my case, I used Podman and pushed the image to Google Cloud Platform (GCP), since this ExaDB-D is in OCI but the Kubernetes deployment is in Google Kubernetes Engine (GKE), a true multicloud setup!

When ready, run:
make all OL=9
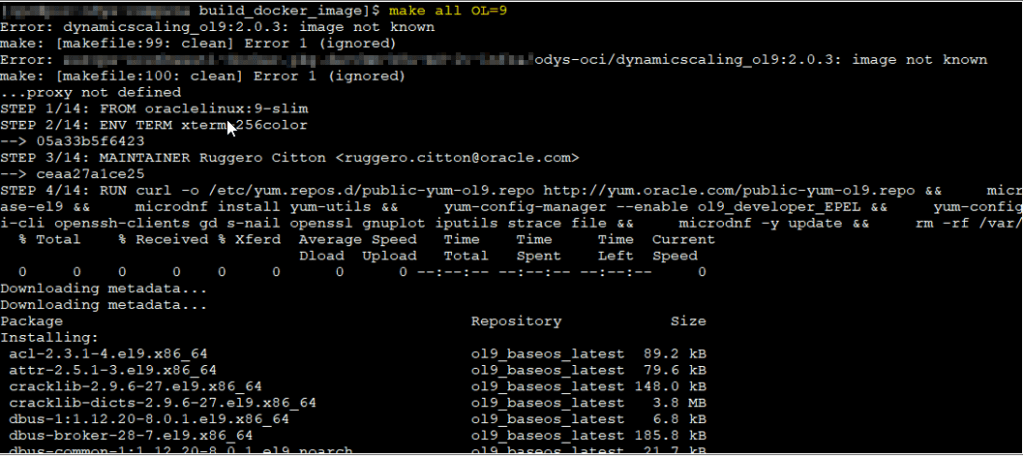
This command:
- Pulls the base
oraclelinux:9-slimimage from Oracle’s container registry. - Installs required packages.
- Copies your ODyS RPMs into the image.
- Pushes the resulting image to your target registry.
Check the Dockerfile for details, it’s worth understanding what happens inside.
Creating Kubernetes secrets
Before deploying, create the necessary secrets manually (or let ds4k8s do it automatically)
At this point, you should have installed kubectl and connected to your Kubernetes cluster. There is plenty of documentation available for this, and the authentication method to your cluster can be different, so just check regarding that.
There are the secrets:
- odys-pull-secret: Authenticates to your image registry.
- odys-oci-api-key: Contains the user’s OCI API key for scaling operations.
- odys-oci-ssh-key: Contains the SSH key used to connect to VM Cluster nodes (usually via
opcuser). - odys-cacert (optional): Use this if you have a public certificate configured.
Example command:
/opt/ds4k8s/ds4k8s.bin makesecrets \
--privatekey /path/pemfile \
--opcsshkey /path/ssh_private_key \
--registry-secretname odys-pull-secret \
--registry xxx \
--registry-username user_name \
--registry-email email_address \
--namespace xx
After creating the secrets, verify them with:
kubectl get secrets -n namespace_X

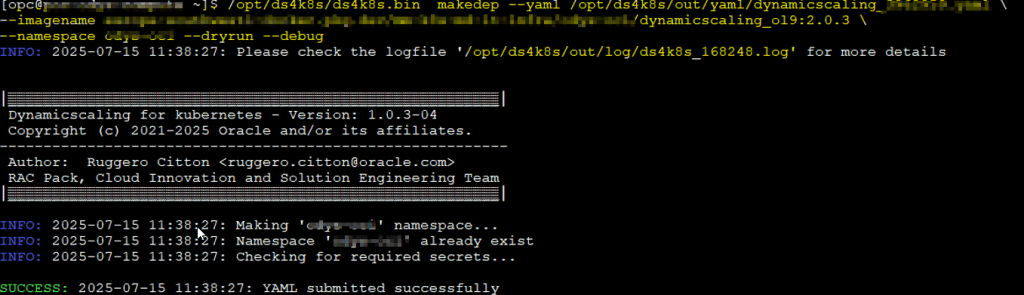
Now, to deploy the pods in Kubernetes we will need to create our yaml, ds4k8s can help us with this as well!
Creating YAML Files with ds4k8s
The makeyaml function generates YAML deployment files for each VM Cluster configuration. You can reuse these YAMLs for future deployments. Parameters like minECPU/, minOCPUmaxECPU/, maxOCPUminThreshold, and maxThreshold usually vary per cluster, as does the cloud-vm-cluster-id.
Example:
/opt/ds4k8s/ds4k8s.bin makeyaml \
--depname odys-vmcluster-deployment \
--ociregion region-x \
--tenancy-id ocid1.tenancy.oc1.. \
--user-id ocid1.user.oc1.. \
--keyfingerprint aa:bb:cc:.. \
--cloud-vm-cluster-id ocid1.cloudvmcluster.oc1.. \
--imagename xxx.. \
--namespace kubernetes-namespace-name \
--minecpu xx \
--maxecpu xx \
--interval xx \
--minthreshold xx \
--maxthreshold xx \
--loadtype max \
--ip-type private \
--ssh-user opc \
--registry-secretname odys-pull-secret \
--privatekey private_key_path \
--dryrun --debug
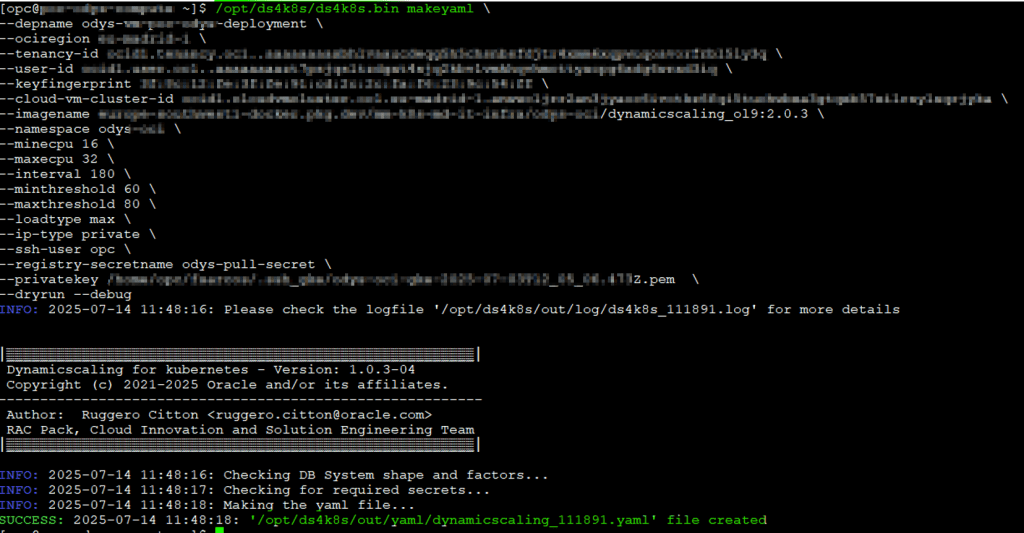
All YAMLs are stored in /opt/ds4k8s/out/yaml/.
Deploying ODyS Pods
With your secrets and YAML ready, deploy your ODyS pod using makedep:
/opt/ds4k8s/ds4k8s.bin makedep --yaml file.yaml \
--imagename xxx... \
--namespace namespace_x --dryrun –debug
Note: Even though the image name is already in the YAML,
makedepmay still prompt for it, just a minor quirk in this version.
So, you have it!
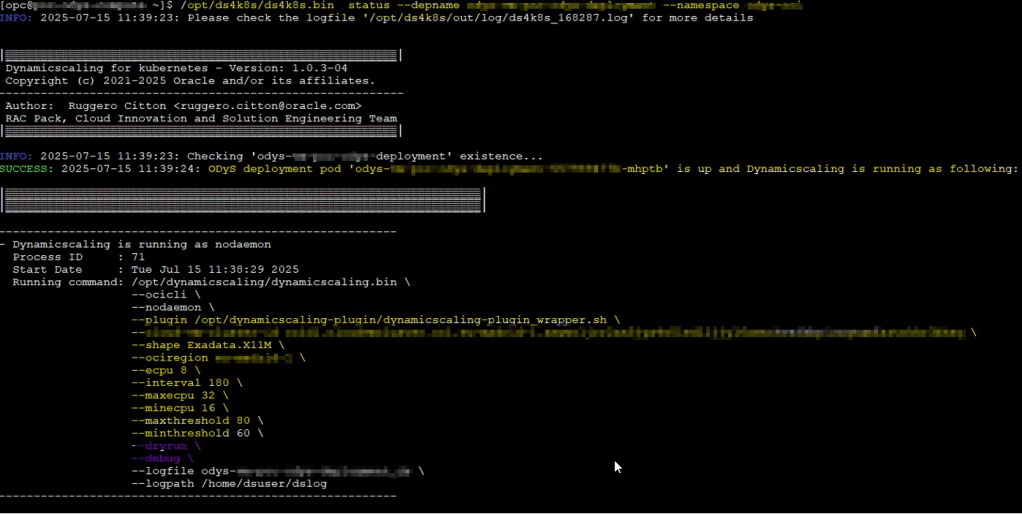
Monitoring pods
What else? well it is important to monitor what your pods are doing. You can use kubectl for that or again, you can use ds4k8s tool as well
Check pod status
/opt/ds4k8s/ds4k8s.bin status --depname <deployment_name> --namespace <namespace_name>
Review logs
/opt/ds4k8s/ds4k8s.bin showlog --depname <deployment_name> --namespace <namespace_name> --follow

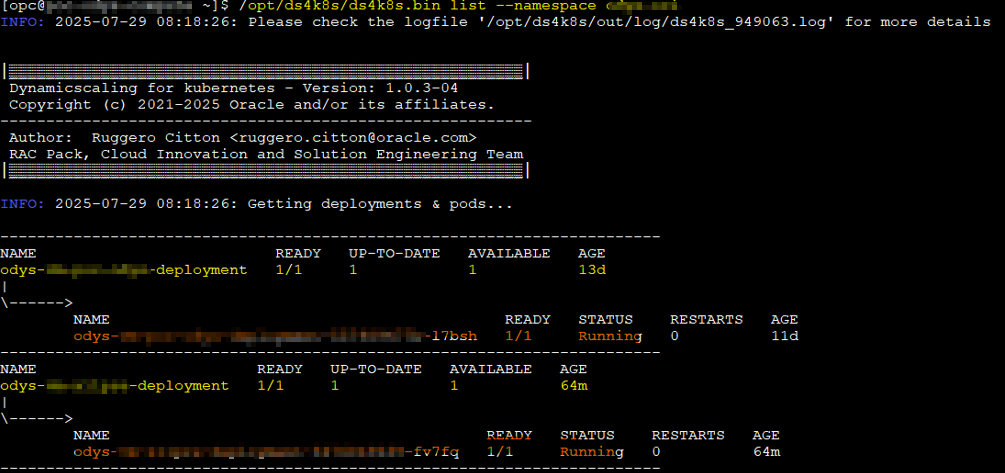
List running pods
/opt/ds4k8s/ds4k8s.bin list --namespace <namespace_name>
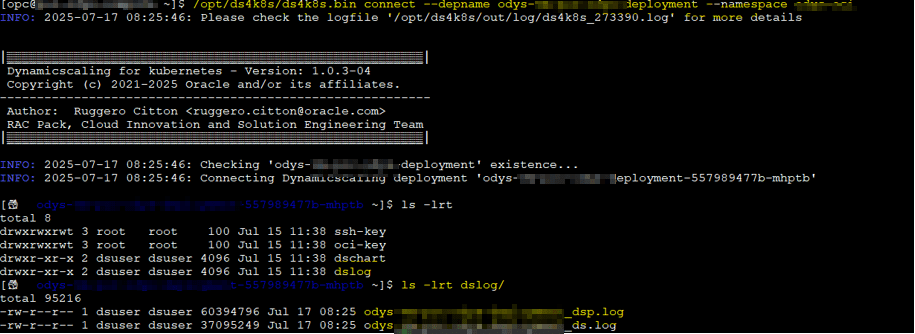
Connect to the pods
Do you want to connect to the pod? well you can use ds4k8s for that as well:
/opt/ds4k8s/ds4k8s.bin connect --depname <deployment-name> --namespace <namespace-name>
Get logs from the pods
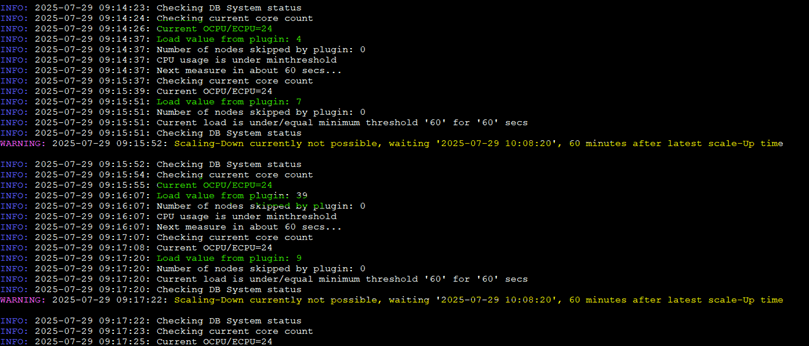
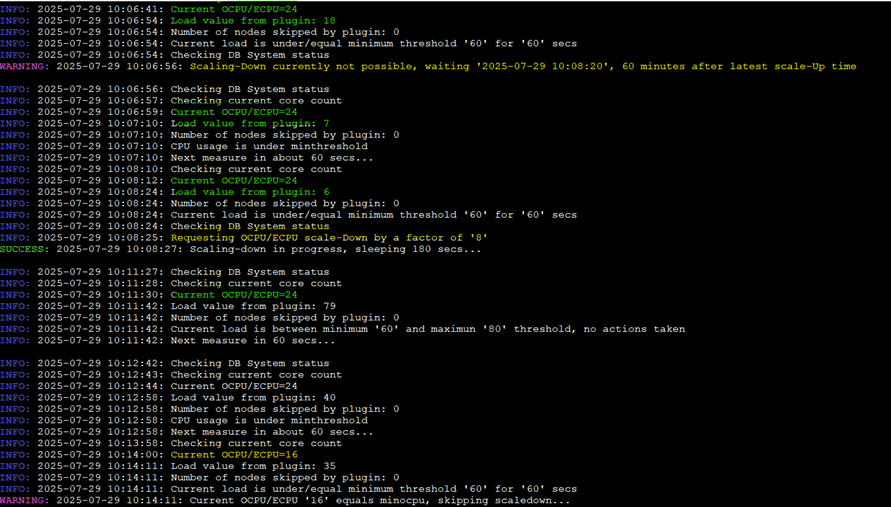
In some cases you will probably need to the get logs from pods to check them out. I actually have a python tool to create some nice html graphs with more info that the chart rpm available.
You can get the logs as follow:
/opt/ds4k8s/ds4k8s.bin getlog --depname <deployment-name> --namespace <namespace-name> --dsplog --path /tmp

You get the idea, right? I hope so!
This is a nice graph that is available from Rugero (creator of this tool) in the official note:
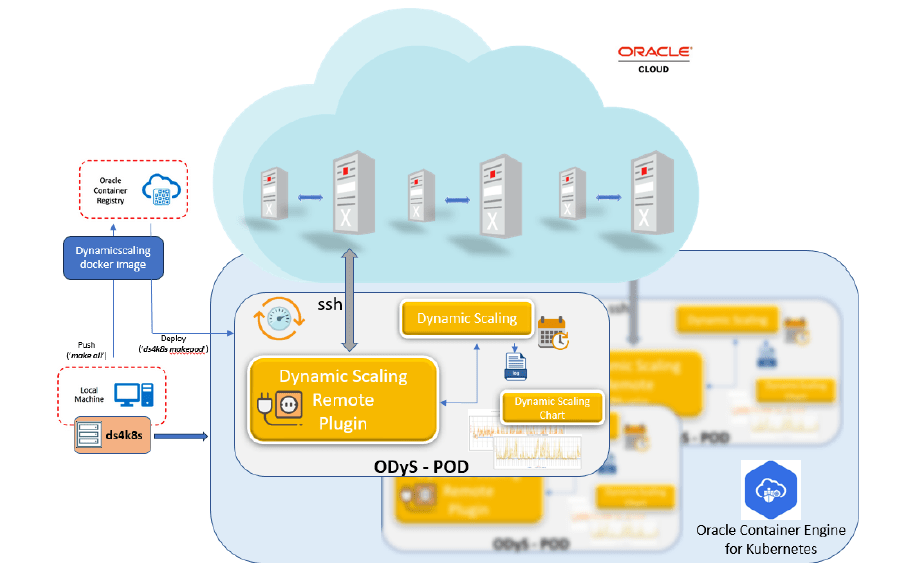
So, how does it all work?
- You deploy one or more ODyS pods in Kubernetes, each monitoring a VM Cluster.
- The pods connect to the VM Cluster using SSH to collect load metrics.
- They use the OCI API key (via the secret) to scale up or down the VM cluster’s OCPUs or ECPUs.
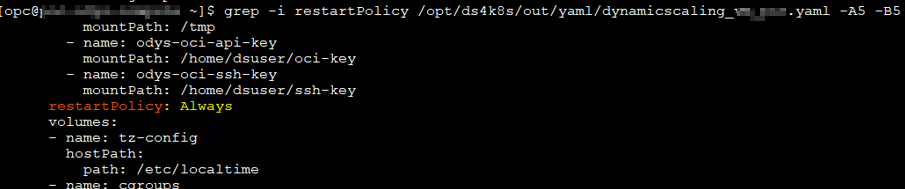
- If a pod crashes, Kubernetes automatically recreates it thanks to the default auto-restart policy. I have tested it =)

It’s a clean, highly available, and cloud-native way to run ODyS, perfect for multi-VM environments and hybrid architectures.
Miscellaneous
Some miscellaneous screenshots about how ODyS works; these are independent of the architecture, meaning local, using an instance, Docker, or in this case, Kubernetes.

Wrap Up
Running Oracle Dynamic Scaling (ODyS) in Kubernetes gives you the best of both worlds:
the flexibility of Oracle’s scaling automation and the resilience of Kubernetes orchestration.
With tools like ds4k8s, you can quickly deploy, monitor, and maintain ODyS pods across environments, whether your infrastructure runs in OCI, on-prem, or even in a multicloud setup like OCI + GKE.
This approach not only aligns perfectly with FinOps principles, but also ensures your Exadata environments are both cost-efficient and performance-optimized.
If you’ve been thinking about taking ODyS to the next level, Kubernetes might just be the smartest way to do it.

Leave a comment