

There is so much to tell about Oracle TDE, that is the reason about writing about a second part and maybe there will be more…, if you haven’t read the first part check out the link: Oracle TDE – How to dealing with?
So, what’s next? Well, I wanted to focus this post about PDBs operations… you know PDB unplug/plug/clone… that’s somehow easier but there are few things you should know and be aware of when TDE is configured in the source and target CDB.
- About this demo/lab part 1:
- Unplug/Plug PDB with TDE involved!
- About this demo/lab part 2:
- Wrapping it Up!
About this demo/lab part 1:
This demo is mainly focus in Oracle 19c that is the actual long term support version
Source Oracle 19c CDB with two PDBs, TDE configured
SQL> select name from v$database;
NAME
---------
DB0505
SQL> show pdbs
    CON_ID CON_NAME                       OPEN MODE  RESTRICTED
---------- ------------------------------ ---------- ----------
         2 PDB$SEED                       READ ONLY  NO
         3 DB0505_PDB1                    READ WRITE NO
         4 PDB2                           READ WRITE NO
Target Oracle 19c CDB with no PDBs…yet!, TDE configured
SQL> select name from v$database;
NAME
---------
TCDB19C
SQL> show pdbs
    CON_ID CON_NAME                       OPEN MODE  RESTRICTED
---------- ------------------------------ ---------- ----------
         2 PDB$SEED                       READ ONLY  NO
Unplug/Plug PDB with TDE involved!
So, I will start with unplug one of the exiting PDB and my source CDB, in this case PDB2 and plug the PDB2 in the target CDB that is TCDB19C.
Before unplug the PDB from the source as TDE is configured we need to export it’s encryption key… but how?
Export PDB encryption key
To export the PDB encryption key we need to connect to the source container DB0505 and while connecting to PDB2 execute the following command:
ALTER SESSION SET CONTAINER = xx;
ADMINISTER KEY MANAGEMENT EXPORT ENCRYPTION KEYS WITH SECRET "***" TO '/home/oracle/export_tde_src_pdb2.p12' FORCE keystore IDENTIFIED BY "***";
I have specify FORCE keyword in the command due to autologin being used.

Btw, the secret password for your exported encryption key does not need to be the same as the keystore password, just in case you don’t know
So, we have our encryption key exported for our PDB, now let’s move on and unplug the PDB from the source CDB.
Unplug PDB
To unplug the PDB we just need to close the PDB and then perform the unplug command:
ALTER PLUGGABLE DATABASE PDBx CLOSE IMMEDIATE INSTANCES=ALL;
ALTER PLUGGABLE DATABASE PDBx UNPLUG INTO '/path/pdbX.xml';
Take into consideration that we haven’t drop the PDB from the source CDB, to drop the PDB from the source CDB without deleting it’s datafile, just execute:
DROP PLUGGABLE DATABASE PDBX KEEP DATAFILES;

Great, we have succesfully unplug and our source CDB is clean now, no PDB2 there.
Plug PDB
To plug a PDB in a target CDB container we just need to create the PDB and provide the XML file we have imported before:
CREATE PLUGGABLE DATABASE PDBx USING '/path/PDBx.xml';

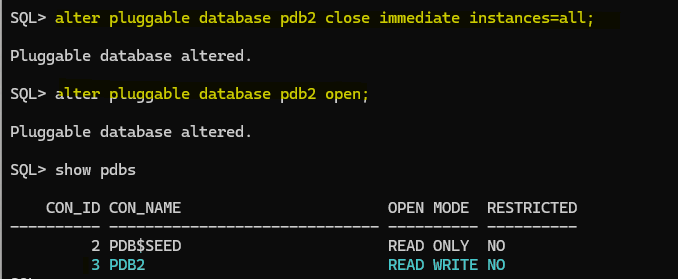
So, I have successfully created the PDB and now it is mounted, let’s try to open it:

As you can see above, the alter pluggable of the PDB has a warning, and if we take a look to the PDB status, it is open in “READ WRITE” mode but it is RESTRICTED, this is because we haven’t imported the encryption key in our target CDB yet, to confirm that point let’s take a look to the PDB_PLUG_IN_VIOLATIONS
SET LINESIZE 250
COL TIME FOR A30
COL NAME FOR A15
COL MESSAGE FOR A50
COL ACTION FOR A40
SELECT TIME, CON_ID, NAME, TYPE, STATUS, ACTION, MESSAGE FROM PDB_PLUG_IN_VIOLATIONS
WHERE TYPE='ERROR';

So, it is confirmed, let’s import the encryption key:
Import PDB encryption key
To import the encryption key we just need execute the import command while connecting to the PDB:
ALTER SESSION SET CONTAINER = PDBx;
ADMINISTER KEY MANAGEMENT IMPORT ENCRYPTION KEYS WITH SECRET "***" FROM '/home/oracle/export_tde_src_pdb2.p12' FORCE keystore IDENTIFIED BY "***" WITH BACKUP;
I have specify FORCE keyword in the command due to autologin being used.

We have successfully imported the encryption key for our PDB in the target CDB, if we take a look to the alert we can see a nice message

Let’s restart our PDB and see what is the status:
Nice!, we are done. PDB is plugged and it is READ WRITE mode no restricted, great!
About this demo/lab part 2:
This demo is mainly focus in Oracle 19c that is the actual long term support version
Source Oracle 19c CDB with two PDBs, TDE configured
SQL> select name from v$database;
NAME
---------
DB0505
SQL> show pdbs
    CON_ID CON_NAME                       OPEN MODE  RESTRICTED
---------- ------------------------------ ---------- ----------
         2 PDB$SEED                       READ ONLY  NO
         3 DB0505_PDB1                    READ WRITE NO
         4 PDB3                           READ WRITE NO
Target Oracle 19c CDB with 1 PDB, TDE configured
SQL> select name from v$database;
NAME
---------
TCDB19C
SQL> show pdbs
    CON_ID CON_NAME                       OPEN MODE  RESTRICTED
---------- ------------------------------ ---------- ----------
         2 PDB$SEED                       READ ONLY  NO
         3 PDB2                           READ WRITE NO
Clone PDB with TDE configured
For this demo, I will clone PDB3 from the source CDB DB0505 to the target CDB TCDB19c, to do a remote clone using dblinks we need to create in our source PDB a user. This use should have some privileges in order to successfully perform the operation, let’s do that.
Source PDB:
ALTER SESSION SET CONTAINER = PDBx;
CREATE USER CLONE_USER_DEMO IDENTIFIED BY "***";
GRANT CREATE SESSION, CREATE PLUGGABLE DATABASE TO CLONE_USER_DEMO;

We have successfully created the user in the source CDB, let’s proceed and create in our target CDB the database link that we will use to clone the PDB.
Target CDB:
Before creating the database link in our target CDB, I will create a TNS entry in the tnsnames.ora, that entry will have the database connection details for the PDB I want to clone, in this case is the PDB3.

To create the database link we connect to the CDB$ROOT in our target database:
CREATE DATABASE LINK SRC_PDBX CONNECT TO CLONE_USER_DEMO IDENTIFIED BY "***" USING 'SOURCE_PDBX';

Next step is to check if database link is working, if you get ORA-02085 you should maybe change the global_names parameter to false, you can do that at session level:

Finally, let’s create the pluggable database in our target CDB using the database link with the following command:
create pluggable database PDBx from PDB3@SRCPDB3 KEYSTORE IDENTIFIED BY <target_wallet_pwd>;

As you can see above the clone was created successfully, let’s take a look to the encryption_wallet and keys:


Looks good!
Wrapping it Up!
So there you have it – TDE is a common task right know and in the context of PDB operations I’ve covered a lot of ground, from the nitty-gritty of unplug/plug actions to the ins and outs of cloning PDBs with TDE configured. By breaking down each step and providing real-world examples, we’ve tried to make the complex world of TDE a bit more approachable.
Whether you’re a seasoned Oracle pro or just dipping your toes into the TDE waters, I hope this post has shed some light on the subject. After all, understanding TDE is a crucial part of mastering Oracle database management. So, armed with the knowledge and insights from this post, you’re well-equipped to tackle TDE challenges with confidence. Happy exploring with you!

Leave a comment