
As I mentioned in this post Exadata Fleet update is available in some regions and hopefully it will be available in the rest soon.
As I mentioned in the previous post, Exadata Fleet update is based on Oracle Fleet Patching and Provisioning (FPP), formerly known as Rapid Home Provisioning (RHP). In this post, I’m going to do a small demo about how FPP works.
DEMO
For the demo I have used the Oracle Live Labs, I suggest that if you have time try for yourself: Oracle Fleet Patching and Provisioning (FPP) – Quick Start
Introduction
Oracle Fleet Patching and Provisioning is part of the Oracle Grid Infrastructure stack. A full Grid Infrastructure environment is required.
For the purpose of this demo, one node is enough. However, two nodes are better for high availability. Please note that Oracle Restart cannot run the FPP Server component due to its ACFS requirement.
As I mentioned previously, FPP is the evolution of RHP. Some commands still use the old acronym, and most of the time they are referring to the same thing. Some examples are:
- FPP Server and rhpserver
- FPP Client and rhpclient
getting into the action, I have a FPP Server (db system) created with only one node:

I’m using Cloud Shell to connect, but you can use any other SSH client of your preference. I have also configured the FPP Server with an SSH public key so I can connect through Cloud Shell using my private SSH key. You can find the way to do it in the lab.

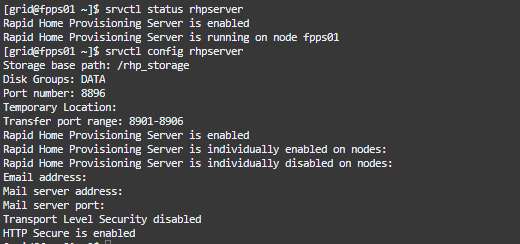
As you can see FPP Server is up and running:
You can use the switch -help to get the available commands along with their syntax:
rhpctl -helpExample:
rhpctl register -help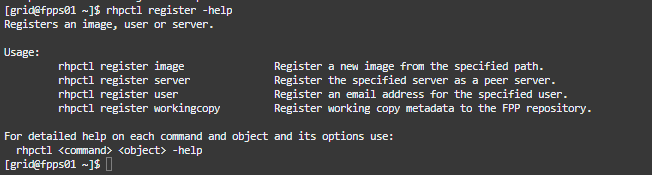
It is quite important that you know where to find the FPP Server log. In this case, it is located at /u01/app/grid/crsdata/fpps01/rhp/logs.

The main log file is rhpserver.log.0. It is very practical if you save the path of the log into an environment variable.
export RHPLOG=/u01/app/grid/crsdata/fpps01/rhp/rhpserver.log.0once you have it, it is pretty straight forward to see what is going on using view $RHPLOG or maybe tail, example:

How to import the local FPP Homes as Gold Images
So, we don’t have any image yet, let’s use the installation we already have to create a gold image, grid home is /u01/app/19.0.0.0/grid. I will use the import image command to create one:
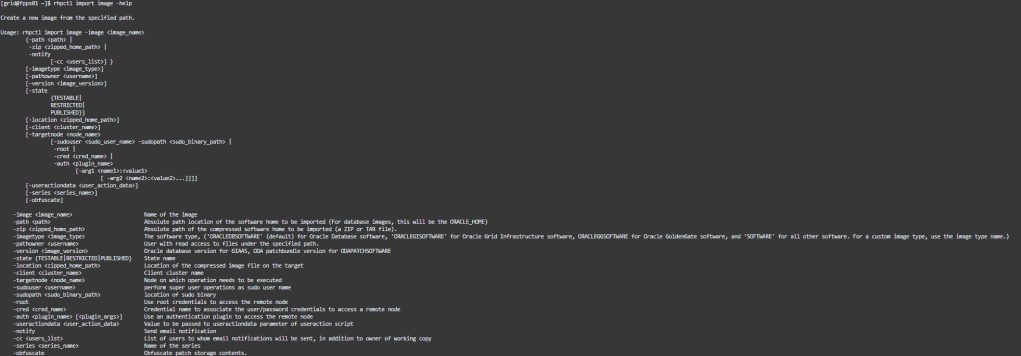
To import software, you need to provide an image name, the software’s absolute or compressed zip path, and the software type. For the software type we have the following options:
- ORACLEDBSOFTWARE (default): for Oracle Database software.
- ORACLEGISOFTWARE: for Oracle Grid Infrastructure software.
- ORACLEGGSOFTWARE: for Oracle GoldenGate software.
- SOFTWARE: for all other software.
- For a custom image type, use the image type name
I’m going to create a image from my current grid software, this is the example command:
rhpctl import image -image gi_current_oci -path /u01/app/19.0.0.0/grid -imagetype ORACLEGISOFTWARE
Now, to create an Oracle Home database software image, let’s do the same:
rhpctl import image -image db_current_oci -path /u01/app/oracle/product/19.0.0.0/dbhome_1
What about using a zip file?
I have the database software 19.17 in the folder /u01/app/grid, I will use the zip file to import the image:
rhpctl import image -image db_previous -zip /u01/app/grid/db1917000.zip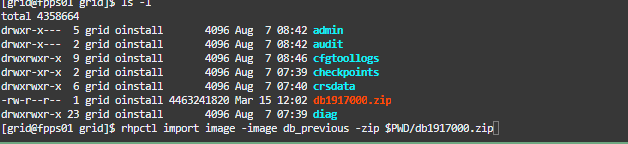

to query the images use:
rhpctl query image
to get specific information from an image you can use:
rhpctl query image -image db_current_oci
One important thing to keep in mind: the groups configured in the image are inherited from the original image, and during any subsequent provisioning of the same image, FPP will try to set the same groups unless specific groups are specified.
So, keep in mind that you can’t move or patch databases between different working copies with different admin groups.
Provision an Oracle Restart environment
We have imported a GI Image in our FPP server, now we want to provision that image and install an Oracle Restart in another server. For that We have another VM created: fppc

As you can see above nothing is running, also there are not binaries installed.
To provision an image we should use from my FPP Server:
rhpctl add workingcopyTo check what we need for this case we can use -help flag
rhpctl add workingcopy -help GRIDHOMEPROVSo, we can get details about the parameters we need.
We have a response file, in the lab you can download it from: https://github.com/oracle-livelabs/database/raw/main/fpp/gi-home/files/fppc.rsp
oracle.install.responseFileVersion=/oracle/install/rspfmt_crsinstall_response_schema_v19.0.0 INVENTORY_LOCATION=/u01/app/oraInventory oracle.install.option=HA_CONFIG ORACLE_BASE=/u01/app/grid oracle.install.asm.OSDBA=dba oracle.install.asm.OSOPER=oper oracle.install.asm.OSASM=asmadmin oracle.install.asm.SYSASMPassword=WelcomeWelcome##123 oracle.install.asm.diskGroup.name=DATA oracle.install.asm.diskGroup.redundancy=EXTERNAL oracle.install.asm.diskGroup.AUSize=4 oracle.install.asm.diskGroup.disks=/dev/oracleasm/asm-disk1 oracle.install.asm.diskGroup.diskDiscoveryString=/dev/oracleasm/* oracle.install.asm.monitorPassword=WelcomeWelcome##123or
wget https://github.com/oracle-livelabs/database/raw/main/fpp/gi-home/files/fppc.rspOn the FPP Server, run the following command to provision and configure the GI home on the target
rhpctl add workingcopy -workingcopy WC_gi_current_FPPC \
-image gi_current_oci -responsefile /u01/app/grid/fppc.rsp \
-path /u01/app/grid/WC_gi_current_FPPC -user oracle -oraclebase /u01/app/oracle \
-targetnode fppc -sudouser opc -sudopath /bin/sudo -ignoreprereq
It will prompt for opc password of the server fpcc if you haven’t configured any ssh key.

ssh into the fpcc server and check the installation

Binaries are in the /u01 and ASM instance is up and running, let’s check the resources running:

Great!, we have Oracle Restart up and running.
Install the Oracle Database homes (working copies)
So, we have some images of Oracle Database software. Let’s provision the images on the target server. I will provision two Oracle Homes with different patch levels.
The first DB image to the target server: fppc
rhpctl add workingcopy -image db_previous -workingcopy WC_db_previous_FPPC \ -storagetype LOCAL -user oracle -oraclebase /u01/app/oracle \ -targetnode fppc -path /u01/app/oracle/product/19.0.0.0/WC_db_previous_FPPC \ -sudouser opc -sudopath /bin/sudo
operation is completed, let’s provision the second DB image to the target server: fpcc, please note the additional -groups parameter passed here
rhpctl add workingcopy -image db_current_oci -workingcopy WC_db_current_FPPC -storagetype LOCAL -user oracle -oraclebase /u01/app/oracle -targetnode fppc -path /u01/app/oracle/product/19.0.0.0/WC_db_current_FPPC -groups OSDBA=dba,OSOPER=oper,OSBACKUP=backupdba,OSDG=dgdba,OSKM=kmdba,OSRAC=racdba -sudouser opc -sudopath /bin/sudo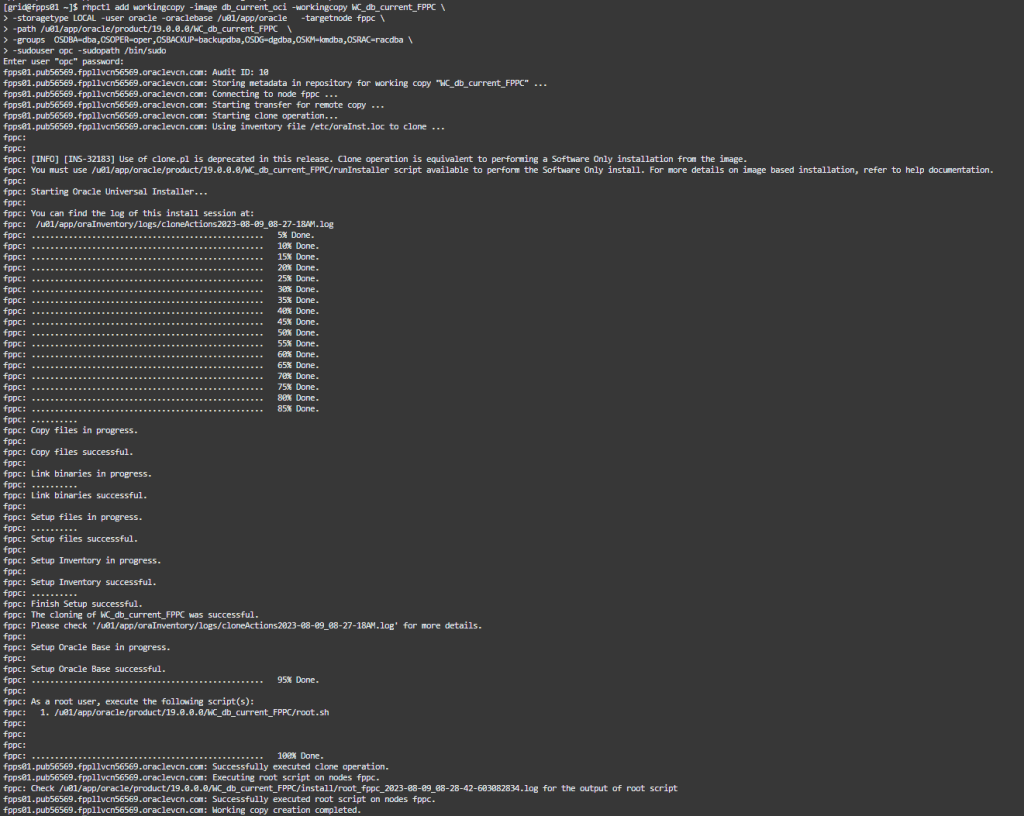
Installations are completed, now we can take a look and see our working copies:
rhpctl query workingcopy
Now, on the target server fppc let’s see the inventory:
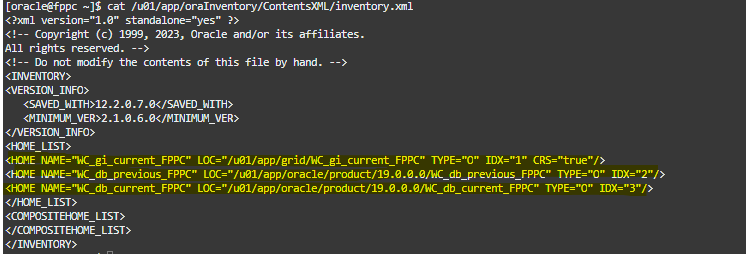
And take a look to our releases version:
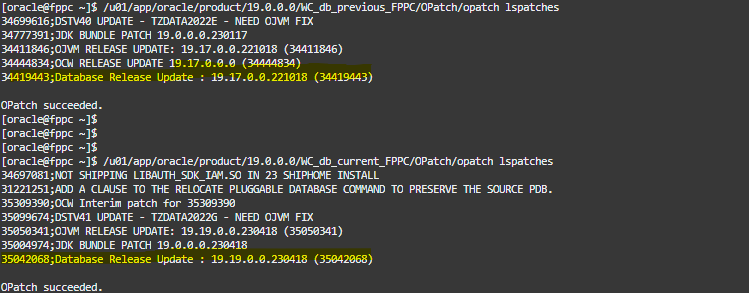
I have an Oracle Database 19.17.0.0 and an Oracle Database 19.19.0.0.
Great!, so using FPP you can create gold images that you can use to provision quickly and easy. In the next post stay tuned as I’m going to do a demo about provisioning new databases and perform patching using FPP.
References:
FPP – Introduction and Technical Overview


Leave a comment